
The wget command or tool is used to download and retrieve data from websites, FTP servers, etc. The wget is very popular in the open-source community as a download manager. The wget command can use different protocols to downloads files and data like HTTP, HTTPS, FTP, etc. The wget tool provides robustness, recursive download, non-interactiveness download, portability, SSL/TLS support.
Install wget
The wget is provided by all Linux distributions like Ubuntu, Debian, Mint, Kali, CentOS, RHEL, etc. But it is not installed by default. If you try to run the wget command in a non-installed system the following wget command not found error is displayed on the command-line interface. The wget command can be installed like below.
Install wget in Ubuntu, Debian, Mint, and Kali:
$ sudo apt install wgetInstall wget in CentOS, RHEL and Fedora:
$ sudo dnf install wgetwget Command Syntax
The wget command has simple syntax where the options and download URL is provided as parameters.
wget OPTIONS URL- OPTIONS is single or more options used to set some attributes about the wget command. OPTIONS is optional.
- URL is the file, path or web page locatation we want to download. The URL is required.
Download File with wget
Let’s start with a simple example. The wget can be used to download a single file just by providing the file URL. There is no need to provide extra parameters or options. In the following example, we download the Linux kernel source file named “linux-5.13.7.tar.xz“. This file is located on the “kernel.org” website.
$ wget https://cdn.kernel.org/pub/linux/kernel/v5.x/linux-5.13.7.tar.xz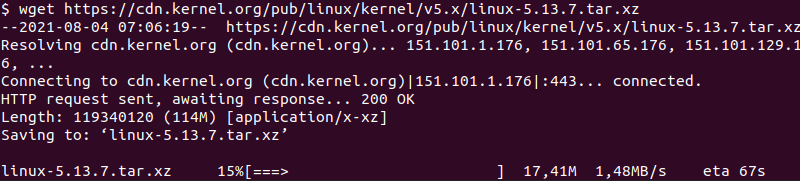
During download, we see the screen above. The wget command provides a lot of information about the download. The current progress is displayed in the last line between square brackets. The completed percentage is displayed before the progress bar with the percentage sign. The downloaded size is displayed after the progress bar which is “17,41M” in this example. The current download speed is displayed after that which is “1,48MB/s“. The last information is the estimated complete time which is “67s“.
Hide Information Screen During Download
Event the wget command provides useful information about the download we may not want to display it during download. The -q option can be used to hide this download information and details. Alternatively, the --quite option can be provided which is the long form of the -q option.
$ wget -q https://cdn.kernel.org/pub/linux/kernel/v5.x/linux-5.13.7.tar.xzSave Downloaded File with Different Name
By default, the downloaded file is stored with its original name provided by the server. We can change the original or default name of the file during save with the -O option. Also, the new name of the download file is provided after the -O option. In the following example, we save the downloaded file with the name of “mykernel.tar.xz”.
$ wget -O mykernel.tar.xz https://cdn.kernel.org/pub/linux/kernel/v5.x/linux-5.13.7.tar.xzDownload a File To The Specified Directory/Path
By default, the file is downloaded to the current working directory or current path. But we can specify different paths or locations to save files. The -P option is used with the path we want to save files to a different location. In the following example, we download file to the “/Downloads”.
$ wget -O /Downloads https://cdn.kernel.org/pub/linux/kernel/v5.x/linux-5.13.7.tar.xzLimit The Download Speed
The download speed is related to the current internet connection speed. By default, the download speed is not limited. But we can limit the download speed which does not fill the bandwidth. The --limit-rate option can be used to limit download speed. In the following example, we set the download limit as 2 Megabit which is expressed as “2m”.
$ wget --limit-rate=2m https://cdn.kernel.org/pub/linux/kernel/v5.x/linux-5.13.7.tar.xzResume Cancelled Download
Especially big files take time to download. Alternatively, the download speed may be very which takes time too. We can cancel a download with the CTRL+C keys and then continue. The file name should be the same as the URL. The -c option is used to continue or resume a canceled or uncompleted download.
$ wget -c https://cdn.kernel.org/pub/linux/kernel/v5.x/linux-5.13.7.tar.xzDownload In Background
The wget command runs as a foreground process by default where it is interactive. The wget command can be also executed in the background too. The -b option is used to run the wget command in the background.
$ wget -b https://cdn.kernel.org/pub/linux/kernel/v5.x/linux-5.13.7.tar.xzThe debug information about the download is stored in the wget-log file in the current working directory which is created automatically by wget command. It contains details about the download. It could be useful to troubleshoot errors and problems with background downloads.
$ cat wget-logSet User-Agent HTTP Header
The HTTP protocol uses the “User-Agent” header to detect the client web browser or agent. While using the wget with the HTTP and HTTPS protocols the “User-Agent” header is provided by default as “wget”. But in some cases, this may create problems like forbidding or access denied. We can set the User-Agent to a different value like a web browser. The --user-agent option can be used to specify the User-Agent header explicitly. In the following example, we set the user agent as “Mozilla Firefox”.
$ wget --user-agent="Mozilla/5.0 (X11; Linux x86_64; rv:60.0) Gecko/20180101 Firefox/80.0" https://cdn.kernel.org/pub/linux/kernel/v5.x/linux-5.13.7.tar.xzDownload Multiple Files or Batch Download
The wget can be used to download multiple files in batch mode. The file URLs are stored into a simple text file line by line and provided to the wget command with the -i option. The wget command reads this file line by line and tries to download specified URLs and files. The following URLs are stored in the file named “downloads.txt”.
http://linuxtect./aaa.txt
https://linuxtect./bbb.txt
https://linuxtect./ccc.txt
We download all these URLs providing the text file named “downloads.txt”.
$ wget -i downloads.txtDownload Sequentially Numbered or Names Files
The wget is generally used with the bash environment. The bash environment features can be used with the wget command. The sequentially numbered files can be specified with a single URL to the wget where all of the sequences can be downloaded.
$ wget -i http://linuxtect./image/picture{1..50}.jpgDownload A Web Page and Its Resources (JavaScript, CSS, Images etc.)
The wget command can be used to download a web page. But a typical web page consists of multiple resources like JavaScript, CSS, images, etc. By default the wget downloads only specified URL. But the --page-requisities option can be used to download all resources related to the web page.
$ wget ‐‐page-requisites ‐‐span-hosts ‐‐convert-links ‐‐adjust-extension httsp://linuxtect.com/Download File From FTP
The wget command supports a lot of different protocols. One of them is the FTP protocol which is used to download and upload files via FTP servers. The wget command can be also used with the FTP protocol without any extra option or effort.
$ wget ftp://linuxtect.com/linux.isoIf the remote FTP server requires authentication with the username and password the --ftp-user and --ftp-password options can be used.
$ wget --ftp-user=ismail --ftp-password=123 ftp://linuxtect.com/linux.isoSkip HTTPS/SSL/TLS Certificate Check
HTTPS is a secure protocol that is encrypted with SSL/TLS certificates. In some cases, the certificates are not valid or can not be validated. This prevents the wget command to run properly. The HTTPS or SSL/TLS check can be skipped with the --no-check-certificate option like below.
$ wget --no-check-certificate https://linuxtect.com/linux.isoDownload To The Standard Output or Redirect
The downloaded file is stored on the disk by default. But we can redirect the downloaded file without saving it to the disk. The downloaded file can be redirected to the “Standard Output” with the - -q and -O option. The | (pipe) is used to redirect it into another command or stream. In the following example, we redirect the downloaded Linux kernel into the tar command
$ wget -q -O - "https://cdn.kernel.org/pub/linux/kernel/v5.x/linux-5.13.7.tar.xz" | tar -xzf - -C /tmp/
Specify Proxy
The wget command can be also used with a proxy. The proxy for the wget command can be specified in different ways like an option, configuration file, or system-wide configuration. In the following example, we provide the proxy information as an option to the wget command. Proxy option provided with -e use_proxy=yes -e http_proxy=192.168.1.10:8080 option
$ wget https://linuxtect.com/linux.iso -e use_proxy=yes -e http_proxy=192.168.1.10:8080 Download Entire Site (Spider Mode)
The wget command can be used to download the entire web site by using the spider mode. The spider mode navigates all URLs provided by the web site by starting the first URL which is provided explicitly. The spider mode can be enabled with the --spider option and also the -r option is provided for recursive download.
wget GUI Tools
The wget is a command-line tool mainly used with terminals. But there are different Graphical User Interface or GUI implementations for the wget command. This GUI provides most of the command line options as a graphical user interface but not all options are covered.
GWget
GWget is the GUI created for the GNOME desktop environment and it is a part of the GNOME project.
Cliget
Cliget is a Firefox extension that uses the wget.
Python wget Module
The wget is also implemented in Python which can be used as a module to download files. For the apt-based distributions, it can be installed like below.
Install Python wget Module For Ubuntu, Debian, Mint and Kali:
$ sudo apt install python3-wgetAlternatively, the pip package manager can be used for all Linux distributions and Windows operating systems to install the Python wget package.
$ pip install wgetNow we can import and use the wget module.
import wget

wget.download("https://linuxtect.com/page.html")